The Cotswold Food Year: butter

Showing posts with label butter. Show all posts

Potato Roses Recipe

Friday, February 15, 2019
Beware making something nice for a wedding tasting - you might have to reprocate it on the wedding day itself!
And so it proved with these potato roses.

Your wedding is your special day. There's no second take, so you have to try everything possible to make it the best you can. I certainly tried to push out all the stops for the weddings we catered for and often made things nobody else would do because they're just too time consuming and which increase the pressure in the kitchen on the day. But I always loved the challenge. 
We were making these late in to the night prior to the wedding day, kind of wishing I'd never had the idea. Then they chill overnight and you can reheat them through the oven just before serving. 
You need to start with Maris Piper potatoes - they are fail safe crispy on the outside and soft in the middle. There's a great video here which shows how they're done. That recipe uses bacon as well - what a great idea!  

Ingredients
8 large Maris Piper Potatoes - look for a more oven tubular shape, peeled
100g Butter, melted (might need slightly more - depending on how you go)
Fresh thyme, taken off the stalk as individual leaves
Fresh garlic, chopped
Salt and freshly ground pepper. You could try using smoked salt.
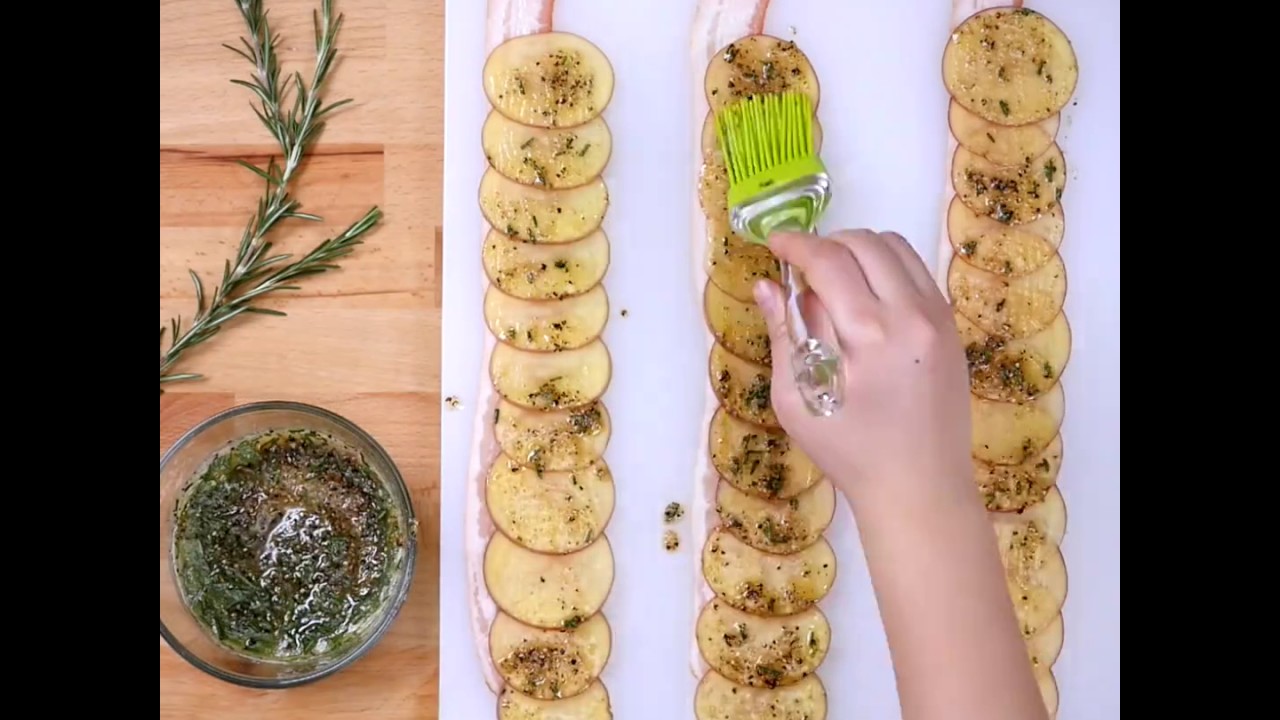
Image result for potato roses
How to lay out potatoes
Tip
It's a good idea to make sure the potatoes are at room temperature. I kept mine in the fridge to keep them fresh, or outside in the winter, so when I was making these potato roses I left the potatoes out in the kitchen to come up to temperature.
If the potatoes are too cold when you mix the melted butter through, the butter solidifies before you have time to lay them out. 
However, if the butter does set you can nuke them in the microwave for a minute or so just to melt the butter again and you're good to go.

Method
  1. Before starting, lightly butter a muffin tin. 
  2. Slice the potatoes thinly on the mandolin. Discard the end pieces (you can bake these separately as crisp snacks with some olive oil & salt). You just want nice big potato slices. 
  3. Place the potatoes in a mixing bowl with the melted butter, garlic and thyme. Season with salt and pepper. Mix together very well, trying to separate out each slice of potato. 
  4. Lay out the potato slices on your kitchen work surface as above. Start with one slice, then overlap with another and so on in a line. I found 16 - 20 slices made a decent portion. 1 line makes one portion. 
  5. When you have laid them all out, roll them tight like a cigar from the bottom to the top. Then place in the muffin tin as seen above and unfurl slightly into a rose shape. They spread out more as they cook - as you see below. 
  6. To bake I found the best way was at 160 oC for about 45 minutes, then turn the oven temperature up to 180 oC for further 10 - 15 minutes to crisp them up. Test them with a knife - the centre should be soft like chips. If they are not cooked in the middle but golden on the edges cover in tin foil to stop them browning and allow them to carry on cooking.  
  7. Lift out of the muffin case with a mini palette knife. 
  8. If you are cooking these in advance, halt them at the 45 minute point where they are still just soft in the middle, but not fully crisped up, like the ones at the top of this page. At this point you can cool them, cover them and refrigerate them till you want to use. They should last 3 days in the fridge. 
  9. Then, when you want to finish them off, place in a preheated oven at 180 oC for 10 - 15 minutes till hot, crisp and golden.

0

Organic Cotswold Brie Brioche

Tuesday, February 12, 2019
These Brioche Parisienne buns make for an interesting cheese course!


For my tasting menus I used to try and introduce people to all the amazing ingredients you can find in the Cotswolds. Once, in between dropping off frozen meals around Stow-on-the-Wold I stopped by Kirkham Farm near Upper Slaughter where they make Simon Weaver's range of cheeses. One of the workers stopped production to serve me. Interesting to see how it's made, and the volumes!

That's the great thing about the Cotswolds - you can pick ingredients up straight from the farm - always interesting to hear production stories first hand.

Here they are in action!


Brie Brioche Recipe 
You can make these plain, without the cheese. Or change the brie for chocolate chips or date & walnut. You can use fresh yeast, but I found Doves Farm instant dried yeast very easy to use and easy to keep on hand.
I got the brioche tins from a charity shop back in 2006 - charity shops are great places to find kitchen equipment bargains.
The recipe I use is from the Bread book by Eric Treuille and Ursula Ferrigno which I have modified slightly to make in my trusty Kenwood Mixer rather than making by hand. I started off making bread by hand, but then I was making so much I couldn't keep up and turned to the mixing machine for help.
Stuff
375g Strong bread flour - try Shipton Mill
2 1/2 tsp Dried yeast
2 tbsp Caster sugar
1 1/2 tsp Salt
5 eggs, beaten up
175g Unsalted butter, softened + extra to brush the brioche tins
Eggwash - either whole egg and a drop of water, or just the egg yolk with a dash of water
Organic Cotswold Brie, cut into pieces - judge the size by the size of the brioche tins

Things

  1. If you're using a mixing machine with dough hook, add the flour to the bowl with the dried yeast , sugar and salt. Add the beaten eggs and mix on the slowest setting for 10 minutes to knead till the dough is soft and elastic.
  2. Cover with a tea towel and leave for 1 - 1 1/2 hours till risen and doubled in size. Knock back, then leave for 10 minutes. 
  3. Add the softened butter and mix in on slow speed. Once the butter is incorporated keep going on slow speed for 5 minutes for a second kneading, then rest for another 5 minutes. 
  4. Grease 10 brioche tins (8cm diameter, 5cm deep) with the extra softened butter. 
  5. Divide the dough in to 10 pieces with a pastry scraper. We're making these into cottage style buns, so then cut each of those 10 pieces into 2 so you have one large piece for the base and 1 small piece for the top - roughly 3/4 and 1/4. 
  6. Roll the brioche base in your hands till round and smooth. Place in the greased brioche tin.
  7. Place a piece of brie on top as the picture above and press down slightly so it stays in position. 
  8. Roll the smaller brioche dough ball and sit it on top of the brie. Press down slightly so it sticks to the base. Make sure the piece of brie is covered by dough. 
  9. Allow to prove for 30 minutes-ish. This depends on the heat of room the dough is in - if it's cold it takes longer, if it's a hot summer's day it will be faster. They should double in size.
  10. Brush the tops with egg glaze. Place on a baking tray and bake in a pre-heated oven at 200 oC until glossy and golden. Turn out and leave on a wire rack.

Note:  Oven temperature may vary depending on your oven. The original recipe says 220 oC. I found 200 oC worked well in my Blue Seal Turbofan oven.


For the brie brioche buns above I served them with an extra slice of brie so you've got the contrast to the baked one in the brioche. Then garnished with caramelised orange, pickled fig, pickled cherry, walnut and dried barberries (from the Turkish shop).
0

Caramelised Oxford Blue Cheese with Bacon Glazed Apples and Almond Butter

Thursday, November 03, 2016
Doesn't bacon make everything taste better? Is it wrong to put it on a cheese course after a(nother) 7 course tasting menu? Those 4 ingredients really were meant to be together though.......

0

Grilled lobster with garlic and herb butter

Thursday, August 25, 2016
The first time I had lobster was in St. Ives in Cornwall, caught locally. The owner of the restaurant was quite fierce and didn't like younger generations making noise, but she let me in because she liked the look of my Chelsea boots.
Grilled lobster with garlic and herb butter, crushed Anya potatoes and French beans wrapped in pancetta
Sometimes simple is best. People can get carried away with lobster dishes, maybe it's best to enjoy it as it is - this is what the host of this party asked for, and it went down really well with everyone!

This was a farewell dinner for the owner of the rather impressive Bibury Court. It has been run as a hotel for nearly 50 years, but small one off boutique hotels are very hard to make work financially. A couple of years ago they reverted it back into a large country house and were letting it out as a whole venue. Pretty amazing for a wedding! We did their Christmas and New Year catering in 2014 - 5. But now, sadly, it has been sold to a wealthy individual who is converting it back into a private house. That's going to be some awesome house!
Native vs. Canadian lobsters
Always go for the native variety - normally from Scotland or Cornwall. Much better all round flavour and texture. 

Do lobsters scream when being plunged into boiling water?
Only in gifs. In reality if you do hear a 'scream' it's air escaping from the inside of the shell. 

Do you have to kill lobsters before you cook them?
If you try cooking dead lobsters (as in dead for a few hours), the flesh breaks down, becomes mushy and disintegrates when cooked - not good to eat. Bacteria works very quickly on lobsters once they die - and it's the bacterial growth which makes the flesh disintegrate. It can also lead to food poisoning. This is why they need to be cooked fresh - you have to respect your ingredients! 

There are humane ways to kill them just before cooking however: 
  • You can place them live in the freezer for 20 minutes prior to cooking to put them to sleep slowly before boiling. 
  • You can stun them before cooking (now required in Switzerland). A stun gun might set you back £2,500.
  • A cooks knife plunged into the head about 4cm down the head in one quick action.  
If you're grilling them, much to the horror of the waitresses you have to split the lobsters live and put them directly on to the grill pan.

Why is lobster tough?
If you've ever sampled lobsters in a restaurant and found them tough, this is most likely when they are pre-cooked and refrigerated, then heated up when serving - the same as if you're buying them cooked from a supermarket. Sacrilege. It's even worse if they're left overnight in the fridge - then you might as well be eating rubber. This is why I would never suggest buying cooked lobster from a shop.  
It may also be that it's been overcooked. Like steak, you don't want to be overcooking your lobster. 

How to cook lobster
Cooking lobster deserves love and attention. You need to cook it absolutely at the last minute before serving, even if this makes a bit of stress in the kitchen. 

Boiling lobster? About 10 minutes for a 1 pound (half kilo) lobster. Lots of salt in the water to bring out the flavour of the lobster flesh. 

Let it cool down slightly before cracking the shell. Don't plunge it into cold water - I've found the lobster flesh sticks to the shell, so when you crack the shell the flesh can tear apart. 

Grilled lobster
Because this is being finished with garlic and herb (chives, sage and thyme from the garden outside the kitchen I was cooking in + tarragon and dill), you cook the bodies slightly less, then take the legs off and put them back on the grill pan to finish cooking. The legs can then be cracked and kept warm and added to the head cavity to garnish just before serving. 
Then the lobster bodies get a brief poaching with the garlic & herb butter in the oven to get the flavour through there just before serving, taking care that it's just cooked, soft & delicious! 
This was the hottest night on record this year, which is why the guests delayed to a 9:30pm start - by which time the air had begun to cool (well in the restaurant area at least! #chefslife).
Golden beetroot and baby leaf kale salad to accompany
The secret ingredients? You can add crushed pink peppercorn and ground cardamon to the garlic butter. Every bit helps!
The lobster's revenge!

0

Crushed Jersey Royal potatoes

Sunday, April 19, 2009
Is there anything you look forward to more than the first Jersey Royals of the season?
They have a taste like no other. Here they are boiled and lightly crushed with the all important skin left on, and mixed with a little unsalted butter and chives.

Best eaten outside they can just make a meal in themselves. These accompanied fillet of beef and also sole in white wine sauce. Also great with trout and smoked trout (or salmon) though.


Related posts:
2

New potatoes in chive butter

Monday, February 16, 2009
We use charlotte potatoes. Turning a potato is one of the very first things you learn as a chef - if you're lucky. The days of large establishments - hotels and even catering companies having a team of chefs turning vegetables is gone, as they can be brought in ready done. I still prefer making my own as shown above - there's no shortcut to quality.

Normally we mix a little melted butter through, but these were left without, so guests could add vinaigrette instead - which goes nicely with the grilled chicken and roast vegetables they had requested.
1

Kitchen tips # 30 - Butter or marge - spread faster not harder

Thursday, October 09, 2008
Make the tea, put the toast on, put the washing machine on, put the slow cooker for the evening meal, iron a few shirts, get the kids up...... and that's all before you start work. Fitting in making rounds of lunchtime sandwiches in that schedule is hard enough, especially when noone in the family will eat the same as the other, so it calls for a time saving tip.....

How many slices of bread have you torn up trying to spread hard butter or marge? Melt it in the microwave (cling film the top so it doesn't splatter - less to clean) and spread it on with a pastry brush. If you line up all your slices of bread in a row, you can 'paint' them all in one long brush stroke. It's the satisfying time saving tips which make mornings bearable.....

Mozzarella, roasted pepper, lettuce mayonnaise and mango chutney on tiger bread

0